The majority of people associate Adobe Photoshop with digital art, graphic design, and photo manipulation. But Photoshop also has strong video editing capabilities that are sometimes disregarded. Photoshop provides an easy approach to edit movies without learning complicated tools for novices, designers, and content creators looking for a straightforward, all-in-one solution.
Photoshop enables you to effectively manage basic video projects, whether you’re producing brief social media pieces, commercial content, or straightforward instructional. Existing users can easily switch to video editing thanks to its well-known interface. FITA Academy offers specialized Photoshop training programs that help learners master image editing, graphic design, and creative tools through real-time projects and hands-on practice.
Understanding Video Editing in Photoshop
Working with the majority of common files is made simple by Photoshop’s support for a variety of video formats, such as MP4, MOV, and AVI. Photoshop concentrates on fundamental editing functions including clipping, layering, and creating visual effects, in contrast to more sophisticated programs like Adobe Premiere Pro.
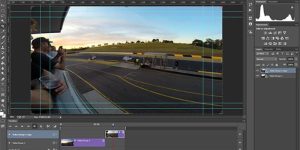
The Timeline panel is the focal point of Photoshop’s video editing workspace. As with photos, you may arrange clips, create layers, and make modifications using this panel. You have editing flexibility since each video clip acts as a layer.
Photoshop is ideal for fast changes and straightforward productions, but it might not be able to substitute professional video editing tools for complicated projects. You may use it efficiently without anticipating sophisticated features like multi-camera editing or deep audio mixing if you are aware of its potential.
Setting Up Workspace and Importing Videos
Open Photoshop and navigate to the Motion workspace to start editing. The Timeline panel and other necessary video editing tools are easily accessible in this arrangement. You can activate the Timeline from the Window menu if it isn’t visible.Next, choose your file and click “Open” to import your video.
Photoshop will use your video clip to automatically generate a new timeline. Photoshop Classes in Chennai provide industry-focused training that helps learners gain expertise in image editing, graphic design, and creative tools through practical applications. Additionally, you can import several clips and organize them at a later time.Take a moment to watch a preview of your video once it has loaded.
This makes it easier for you to see where changes are required. Properly setting up your workstation now will save you time later. A more seamless editing process is ensured by keeping layers named and organized, particularly when dealing with several movies or effects.
Trimming, Splitting, and Arranging Clips
Cutting and organizing your clips is the first step in editing. You can change a clip’s duration by dragging its edges in the Timeline panel. This is helpful for cutting out unnecessary parts or concentrating on important points.Use the split tool after moving the playhead to the desired location to split a clip.
This enables you to edit a video more precisely by breaking it up into smaller parts. These sections can then be rearranged to produce a seamless flow.Adding overlays or stacking clips is simple with layer-based editing. For instance, you can overlay your video with text or pictures. You may build a solid basis for future improvements by efficiently arranging your clips.
Adding Transitions, Text, and Effects
You may add text, visual effects, and transitions to your films using Photoshop. To create seamless scene changes, you can incorporate fade transitions between clips. The whole viewing experience is enhanced by these subtle effects.Another potent feature is text.
You can annotate, comment, or add titles to your movie with the Type tool. B School in Chennai can significantly boost your career readiness and employability by enhancing your graphic design skills, image editing techniques, and creative visual communication expertise.
To fit your style, you can alter the fonts, colors, and animations.You may apply effects like brightness, contrast, and color grading using filters and adjustment layers. With the use of these tools, you can make your film look consistent throughout. Photoshop’s effects are more than sufficient for simple creative tasks, even though they are not as sophisticated as those found in specialized video editors.
Adjusting Audio, Speed, and Color
In video editing, audio is crucial. You can immediately change the volume of your video clip in Photoshop’s Timeline. If necessary, you can also add background music or mute certain parts.You may create fast-forward or slow-motion effects by adjusting the speed. You can adjust the speed at which a clip plays by changing its duration. This is helpful for making dramatic graphics or emphasizing significant occasions.
Another important feature is color correcting. You may alter color balance, contrast, and brightness using adjustment layers. These changes guarantee a polished appearance and enhance the overall quality of your film.
Exporting and Rendering Your Video
Exporting your video is the last step after editing is finished. By choosing the export option from the File menu in Photoshop, you can render your project. Depending on your requirements, select the proper format, resolution, and quality settings.Exporting as a high-quality MP4 file is an excellent option for the majority of jobs. These are the features of photoshop.
This format is highly suited for web platforms and is extensively supported. Depending on where you want to distribute your movie, you can also change the resolution and frame rate.Make sure everything appears right by previewing your video before exporting. Reviewing your work for a few more minutes guarantees a polished end product and helps prevent errors.
Common Issues and How to Fix Them
Playback latency and unsupported file formats are common problems for beginners. Try lowering the preview quality or shutting down other programs to free up system resources if your video isn’t playing smoothly.
Incorrect file import is another frequent issue. Make sure Photoshop supports the format of your video. This problem can be fixed by converting the file to a compatible format.Working with several elements can also lead to layer confusion. Errors can be avoided by keeping your layers identified and arranged neatly. You can troubleshoot efficiently and keep editing without becoming frustrated if you are aware of these typical issues.
Tips for Better Workflow and Efficiency
You can increase the speed and enjoyment of video editing by streamlining your workflow. For common tasks like cutting, moving, and previewing clips, start by utilizing keyboard shortcuts. Time is saved and repetitive chores are decreased as a result.
Prior to beginning your project, arrange your files and resources. It is simpler to access and manage your resources when everything is in one location.You can expedite your work by using templates and settings. You can store frequently used text styles or effects, for instance, for use in subsequent projects.
Lastly, practice frequently. You will grow more proficient and self-assured as you play around with Photoshop’s video capabilities. The secret to perfecting any creative skill is consistent practice.
What is Next?
For novices and designers looking to advance their abilities, editing films with Adobe Photoshop is a useful and approachable choice. It may not be able to replace sophisticated tools, but it has enough functionality to easily produce videos that seem professional.
You can turn basic clips into interesting content by learning the fundamentals, organizing your workplace, and taking a methodical approach. Photoshop becomes more than just an image editor with practice and imagination; it becomes a flexible tool for creating multimedia.